转自: http://muscle-liu.spaces.live.com ( Muscle )
上次介绍了一下
polish的大概。其实本人我对j2me和polish都是刚接触的,以下来我会同时介绍j2me和polish的学习心得。以下我们以一个
expenses tracker(builder.com里的一个例子)的例子来介绍建立polish项目(这个例子可以在)。 在netbeans我们可以先建立一个一般的Mobile的项目,按netbeans 向导很容易建立。这里工程expenses tracker里有两个类: Expenses.java: /*
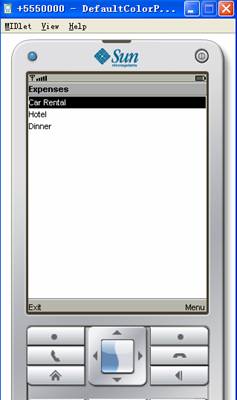
运行此工程如下: 现在我们来让这个工程变为polish工程: 我
们可以把{polish.home}/sample/blank里的blank例子里的全部文件copy到expenses tracker
工程下,然后把原来expenses
tracker工程文件夹下的src文件夹移入source文件夹里。把build-netbeans.xml改名为build.xml替换旧的
build.xml文件。 然后我们来修改build.xml: 1)、工程名可以可以改为 2)、把全部<deviceRequirements> 注释掉改为: <deviceRequirements> 这里你可以把value值改为你想显示的模拟器,但是模拟器要安装在你机上,且polish支持(可以查看{polish.home}里的devices.xml文件看polish是否支持)。 3)、<midlet />属性改为你工程的midlet类本例子如下: 4)、引入{polish.home}/import/enough-j2mepolish-client.jar; (注:我们也可以不用建立工程,直接把blank工程copy到你的工程目录下, 然后把你的旧工程代码src目录放入cource文件夹, 然后按上边的修改后在netbeans打开工程就可以了。) 现在就可以运行程序看看效果: 现在我们来说说上边的ExpensesTracker里边用到的j2me知识,同时我会介绍polish,通过polish来美化
ExpensesTracker。我会从j2me基本的GUI(主要是javax.microedition.lcdui;类)编程,然后会讨论j2me
里的数据存储。 ExpensesTracker
程序里边由一个单独的MIDlet(Expenses)和一个数据类(ExpenseInfo)组成。Expenses提供了简单的UI,而
ExpenseInfo则定义了数据的结构(fields for data and time, description, amount, and
category
)。因为lcdc1.0是不支持floating-point数据的(lcdc1.1支持),所在在ExpenseInfo里用两个独立的int
来记录expense amount的dollars和cents。 基本UI: 从上边工程运行的效果来看,Expenses UI 由一个List 组件(显示了你记录了的Expense条目)和三个Command 组件(quitting the app, editing an item, adding a new item)组成。 List是继承Screen类而来的,在j2me中的List组件其有三种类型: · Implicit Lists (Expenses里是用此类型) :允许只能选择一个item, 当你选择某个item时会触发commandAction 事件。 · Exclusive Lists(单选):以radio按钮形式显示,一次只能选择一个item,选择时不会触发commandAction 事件。 · Multiple Lists(多选): 以check boxes 按钮形式显示,允许多选,选择时不会触发commandAction事件。 当用户选择之后,可以通过下面的方法返回选定的索引值: getSelectedIndex()--------返回List中一个选定项的索引值。 Polish工程项目的编译,运行,打包等等,是由build.xml文件控制的。下边是ExpensesTracker工程里的build.xml: <project <!-- Definition of the J2ME Polish task: --> <target name="clean" <target <!-- NetBeans specific build targets: --> <target name="rebuild" <target name="rebuild-all" <target name="jar-all" <target name="clean-all" <target name="compile-single" <target name="enableCustomization1"> build.xml文件中最主要的是<info>,<deviceRequirements>和<build>三部分。 其中<info>元素指定说明了工程中的一般信息,如,工程名和版本。<deviceRequirements>
元素是用来指定程序编译时所选择的模拟器。<build>元素是工程编译构件时的主要控制器(如,可以设定属性
usePolishGui=”true”来指定把polish应用当前工程中,而设为false时,则说明当前工程不引入polish,此时工程与一般的
mobile应用程序一样)。 当build.xml文件中的<build>属性usePolishGui=”true”时,我们就可以修改工程目录中
resources里的polish.css文件控制程序的显示(美化j2me介面)。在j2me程序中只需要以“//#style”指令就可以调用相应
的css属性(请注意这指令与注释“//”的区别)。
其中,polish.css文件包含对应用程序的全部items和screens的style定义。 polish.css文件中常用的预定义的style(用于程序中的所有items和screens,但当引用自定义style时,预定义的style会被自定义style覆盖掉: colors{}:用来定义一系列的颜色,供其它style中的color属性引用。 backgrounds{}:用来定义一系列的背景,供其它style中的background属性引用。 borders{}:用来定义一系列的边框,供其它style中的border属性引用。 focused{}:当获取某个item或screen的焦点时的style。 title{}:应用于所以screen中的title的style。 scrollbar{}:当build.xml文件中“polish.useScrollBar“变量设为true时被scrollbar引用。 label{}:应用于所以item或menu中标签的style。 以下style是当build.xml文件中“polish.MenuBar.useExtendMenuBar“变量设为true时被引用的: menubar{}, menu{},menuItem{},leftcommand{},rightcommand{} polish.css文件中自定义style: 注意:styel可以继承的,且引用子style时既保留父style的属性又有自己的属性,同时子style可以重写父style属性。 自定义style名称:如“.mystyle{}”是由点加字符串。注意不能是与预定义的名称相同。 下面我们来对ExpensesTracker中的UI---List以CSS进行修改。 修改后程序运行如下: 其polish.css文件: colors { focused { /** 而Expenses.java中引用CSS的地方(绿色字体): public Expenses() { lsMain.setCommandListener(this); private void rebuildList(){
Expenses
A sample J2ME MIDP application that illustrates the use
of List and Command UI components
Copyright 2002 CNet Networks
*/
package ExpensesApp;
import javax.microedition.midlet.*;
import javax.microedition.lcdui.*;
import java.util.Vector;
public class Expenses extends MIDlet implements CommandListener {
private Display display;
private Vector expenseItems;
private List lsMain;
private Command cmAdd, cmEdit, cmExit, cmMenu;
private int itemCount = 0;
public Expenses() {
display = Display.getDisplay(this);
// get some play data
expenseItems = ExpenseInfo.LoadExpenses();
itemCount = expenseItems.size();
// Setup the UI
lsMain = new List("Expenses", List.IMPLICIT) ;
cmAdd = new Command("New", Command.SCREEN, 3);
cmEdit = new Command("Edit", Command.ITEM, 2);
cmExit = new Command("Exit", Command.EXIT, 1);
lsMain.addCommand(cmAdd);
lsMain.addCommand(cmEdit);
lsMain.addCommand(cmExit);
lsMain.setCommandListener(this);
// add all the Expense items to lsMain
rebuildList();
}
public void startApp() throws MIDletStateChangeException {
// Show the main UI form
display.setCurrent(lsMain);
}
public void commandAction(Command cm, Displayable d) {
if (cm == List.SELECT_COMMAND || cm == cmEdit) {
// User selected an item in lsMain or
// invoked the "Edit" command from the menu
// Edit an item, we'll implement this later
} else if (cm == cmAdd) {
// User invoked the "Add" command from the menu
// Add a new item, we'll implement this later
} else if (cm == cmExit) {
// User invoked the "Exit" command
destroyApp(false);
notifyDestroyed();
}
}
public void pauseApp() {
}
public void destroyApp(boolean b) {
}
private void rebuildList(){
// add all the expense items to lsMain
for(int i=0; i<expenseItems.size(); i++){
if (expenseItems.elementAt(i) != null){
ExpenseInfo exp = (ExpenseInfo) expenseItems.elementAt(i);
lsMain.append(exp.getDescription(),null);
}
}
}
}
ExpenseInfo.java:
/*
ExpenseInfo
Models an expense item for the sample Expenses
J2ME MIDP application
Copyright 2002 CNet Networks
*/
package ExpensesApp;
import java.util.Date;
import java.util.Vector;
public class ExpenseInfo {
// Expense Item categories
public static final String[] Categories = {"Meals","Lodging","Car","Entertain","Misc"};
public static final int CATEGORY_MEALS = 0, CATEGORY_LODGING = 1,
CATEGORY_CAR = 2, CATEGORY_ENTER = 3, CATEGORY_MISC = 4;
// member variables
private Date ExpenseDate;
private String ExpenseDescription;
// We don't have floating point support,
// so we have to fake it with two int variables
// to store the amount of the expense
private int ExpenseDollars;
private int ExpenseCents;
private int ExpenseId;
private String ExpenseCategory;
private int ExpenseCategoryID;
public static Vector LoadExpenses() {
// Eventually, we'll need to load expenses from
// the data store into this vector, but for now
// let's just load some play data
Vector v = new Vector();
ExpenseInfo exp = new ExpenseInfo();
exp.setDescription("Car Rental");
exp.setDollars(25);
exp.setCents(99);
exp.setCategoryID(CATEGORY_CAR);
v.addElement(exp);
exp = new ExpenseInfo();
exp.setDescription("Hotel");
exp.setDollars(54);
exp.setCents(00);
exp.setCategoryID(ExpenseInfo.CATEGORY_LODGING);
v.addElement(exp);
exp = new ExpenseInfo();
exp.setDescription("Dinner");
exp.setDollars(18);
exp.setCents(78);
exp.setCategoryID(ExpenseInfo.CATEGORY_MEALS);
v.addElement(exp);
return v;
}
public ExpenseInfo(){
ExpenseDate = new Date();
ExpenseDescription = "";
ExpenseDollars = 0;
ExpenseCents = 0;
ExpenseCategoryID = ExpenseInfo.CATEGORY_MISC;
}
public void save() {
// mock saving data by printing to the console
System.out.println (ExpenseDate.toString() + " " + ExpenseDescription
+ " $" + String.valueOf(ExpenseDollars) + "." + String.valueOf(ExpenseCents));
}
// The rest of these are simply accessor methods
// for the class's private fields.
public void setDate(Date newDate){
ExpenseDate = newDate;
}
public Date getDate(){
return ExpenseDate;
}
public void setDescription(String newDescription){
ExpenseDescription = newDescription;
}
public String getDescription(){
return ExpenseDescription;
}
public void setDollars(int newDollars){
ExpenseDollars = newDollars;
}
public int getDollars(){
return ExpenseDollars;
}
public void setCents(int newCents){
ExpenseCents = newCents;
}
public int getCents() {
return ExpenseCents;
}
public String getCategory(){
return ExpenseCategory;
}
public int getCategoryID(){
return ExpenseCategoryID;
}
public void setCategoryID(int newID){
ExpenseCategoryID = newID;
ExpenseCategory = Categories[newID];
}
}
ExpensesTracker,
<j2mepolish></j2mepolish>中的<info> jarName可改为:
jarName="${polish.vendor}-${polish.name}-${polish.locale}-ExpensesTracker.jar"
(这是生成的jar和jad的名称,你也可以不改)。
<requirement name="Identifier" value="Generic/midp1" />
</deviceRequirements>
<midlet class="ExpensesApp.ExpenseInfo" name="ExpenseInfo" /> 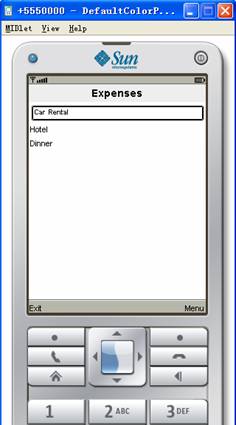
name="ExpenseTracker"
default="j2mepolish">
<!-- extend the default NetBeans build script: -->
<import file="nbproject/build-impl.xml"/>
<!-- import user specific properties -->
<property file="${user.name}.properties" />
<!-- The polish.home property needs to point to the directory -->
<!-- containing the J2ME Polish installation. -->
<property name="polish.home" location="C:\Program Files\J2ME-Polish" />
<!-- import global properties -->
<property file="${polish.home}/global.properties" />
<taskdef name="j2mepolish"
classname="de.enough.polish.ant.PolishTask"
classpath="${polish.home}/lib/enough-j2mepolish-build.jar:${polish.home}/lib/jdom.jar"
/>
<!-- build targets, each target can be called via "ant [name]",
e.g. "ant clean", "ant test j2mepolish" or just "ant" for calling the default-target -->
<target name="j2mepolish-init"
depends="init"
>
<property name="test" value="false" />
<property name="customization" value="" />
<property name="dir.work" value="build/real/${customization}" />
<property name="dir.dist" value="dist/${customization}" />
<property name="deploy-url" value="" />
</target>
<!-- In this target the J2ME Polish task is used. -->
<!-- It has 3 sections: -->
<!-- 1. The info-section defines some general information -->
<!-- 2. The deviceRequirements-section chooses the devices -->
<!-- for which the application is optimized. -->
<!-- 3. The build-section controls the actual build -->
<!-- process. -->
<target name="j2mepolish"
depends="j2mepolish-init"
description="This is the controller for the J2ME build process."
>
<j2mepolish>
<!-- general settings -->
<info copyright="Copyright 2006, 2007 Your Company. All rights reserved."
description="Please describe me."
infoUrl="http://www.j2mepolish.org"
jarName="${polish.vendor}-${polish.name}-${polish.locale}-ExpenseTracker.jar"
jarUrl="${deploy-url}${polish.jarName}"
name="ExpenseTracker"
vendorName="Enough Software"
version="1.0.0"
/>
<!-- selection of supported devices -->
<deviceRequirements if="config.active:defined and (test or enableCompilerMode)" >
<requirement name="Identifier" value="${config.active}" />
</deviceRequirements>
<deviceRequirements if="device:defined and (test or
enableCompilerMode)" unless="config.active:defined">
<requirement name="Identifier" value="${device}" />
</deviceRequirements>
<deviceRequirements unless="test or enableCompilerMode">
<requirement name="Identifier" value="${devices}" />
</deviceRequirements>
<!-- build settings -->
<build fullscreen="menu"
symbols="polish.skipArgumentCheck"
usePolishGui="true"
workDir="${dir.work}"
destDir="${dir.dist}"
>
<!-- midlets definition -->
<!-- NetBeans defines this property automatically: -->
<midlets definition="${manifest.midlets}" if="manifest.midlets:defined" />
<midlets unless="manifest.midlets:defined">
<midlet class="ExpensesApp.Expenses" name="ExpensesTracker" />
</midlets>
<!-- project-wide variables - used for preprocessing -->
<variables>
<!-- Sample configuration options for J2ME Polish
<variable name="polish.TextField.useDirectInput" value="true" />
<variable name="polish.TextField.supportSymbolsEntry" value="true" />
<variable name="polish.MenuBar.useExtendedMenuBar" value="true" />
<variable name="polish.useScrollBar" value="true" />
-->
</variables>
<!-- Configure the customization settings here: -->
<resources
dir="resources/base"
defaultexcludes="yes"
excludes="readme.txt"
>
<root dir="resources/base/images" />
<root dir="resources/base/sounds" />
<root dir="resources/${customization}" if="build.${customization}" />
<root dir="resources/${customization}/images" if="build.${customization}" />
<root dir="resources/${customization}/sounds" if="build.${customization}" />
<!-- add the localization element for created localized
versions of your application:
<localization>
<locale name="en_US" />
<locale name="de_DE" encoding="utf-8" unless="test" />
</localization>
-->
</resources>
<!-- obfuscator settings: do not obfuscate when the test-property is true -->
<obfuscator name="ProGuard" unless="test" >
<!--
You can set additional parameters here, e.g.:
<parameter name="optimize" value="false" />
-->
</obfuscator>
<!-- log settings: only use debug setting when the test-property is true -->
<debug if="test" showLogOnError="true" verbose="true" level="error">
<filter pattern="de.enough.polish.example.*" level="debug" />
<filter pattern="de.enough.polish.ui.*" level="warn" />
<!-- example for writing log entries to the Recordstore Management System:
<handler name="rms" />
-->
</debug>
<!-- user defined JAD attributes can also be used: -->
<jad>
<attribute name="Nokia-MIDlet-Category" value="Game" if="polish.group.Series40" />
</jad>
</build>
<!-- execution of emulator(s) -->
<emulator
wait="true"
trace="none"
securityDomain="trusted"
enableProfiler="false"
enableMemoryMonitor="false"
enableNetworkMonitor="false"
if="test and not debug"
>
<!--
<parameter name="-Xjam" value="transient=http://localhost:8080/${polish.jadName}" />
-->
</emulator>
<emulator
wait="true"
securityDomain="trusted"
enableProfiler="false"
enableMemoryMonitor="false"
enableNetworkMonitor="false"
if="debug"
>
<!-- Attach the emulator to the NetBeans debugger: -->
<debugger name="antcall" target="connect-debugger" port="6001" />
</emulator>
</j2mepolish>
</target>
<target name="setdeploy"
description="Call this target first to set the OTA download-URL, e.g. ant setdeploy j2mepolish"
>
<property name="deploy-url" value="http://www.company.com/download/" />
</target>
<target name="enableDebug"
description="Call this target first to skip the obfuscation step, call
the emulator and start the debugger, e.g. ant enableDebug j2mepolish"
>
<property name="debug" value="true" />
</target>
<target name="enableEmulator"
description="Call this target first to skip the obfuscation step and call the emulator, e.g. ant test j2mepolish"
>
<property name="test" value="true" />
<property name="dir.work" value="build/test" />
</target>
<target
name="emulator"
depends="enableEmulator,j2mepolish"
description="invokes the emulator"
>
</target>
description="allows a clean build. You should call [ant clean] whenever
you made changes to devices.xml, vendors.xml or groups.xml">
<delete dir="build" />
<delete dir="dist" includes="**/*" />
</target>
name="cleanbuild"
description="allows a clean build. You should call [ant cleanbuild]
whenever you made changes to devices.xml, vendors.xml or groups.xml"
depends="clean, j2mepolish"
/>
<target name="debug" description="debugs the project" depends="enableDebug, enableEmulator, j2mepolish" />
<target name="deploy"
description="Deploys the applications. Currently empty."
depends="j2mepolish"
/>
<target name="run"
depends="enableEmulator, j2mepolish"
>
</target>
depends="clean, j2mepolish"
>
</target>
depends="clean, j2mepolish"
>
</target>
<target name="jar"
depends="j2mepolish"
>
</target>
depends="j2mepolish"
>
</target>
depends="clean"
>
</target>
<target name="deploy-all"
depends="deploy"
>
</target>
<target name="enable-compiler-mode">
<property name="enableCompilerMode" value="true" />
</target>
depends="enable-compiler-mode, j2mepolish"
>
</target>
<target name="connect-debugger">
<property name="jpda.port" value="${polish.debug.port}" />
<antcall target="nbdebug"/>
</target>
<property name="dir.work" value="build/customization1" />
<property name="cfg.customization1" value="true" />
</target>
<target name="customization1"
description="customizes this project with the settings found in resources/customization1"
depends="enableCustomization1, j2mepolish"
/>
<target name="enableCustomization2">
<property name="dir.work" value="build/customization2" />
<property name="cfg.customization2" value="true" />
</target>
<target name="customization2"
description="customizes this project with the settings found in resources/customization2"
depends="enableCustomization2, j2mepolish"
/>
</project>
fontColor: rgb( 30, 85, 86 );
focusedFontColor: #000;
bgColor: #eee;
focusedBgColor: #fff;
borderColor: fontColor;
focusedBorderColor: focusedFontColor;
}
margin: 1;
margin: 3;
background {
type: round-rect;
arc: 4;
color: focusedBgColor;
border-color: focusedBorderColor;
border-width: 2;
}
font {
style: bold;
color: focusedFontColor;
size: small;
}
layout: expand;
}
* The title style is a predefined style which is used
* for all screen-titles.
*/
title {
padding: 2;
font-face: proportional;
font-size: large;
font-style: bold;
font-color: focusedFontColor;
border: none;
background {
type: vertical-gradient;
top-color: #fff;
bottom-color: rgb(140,206,220);
start: 10%;
end: 90%;
}
layout: expand|center;
}
.expenseList{
background {
image:url(BG.png);
color: rgb(184,235,246)
}
}
.expenseItem{
margin: 3;
padding-left: 3;
font-face: proportional;
font-size: small;
font-style: bold;
font-color: focusedFontColor;
focused-style: expenseItemFocused;
}
.expenseItemFocused extends .expenseItem{
background-color: argb( 150, 255, 255, 255 );
after: url(listItem.png);
layout:expand;
}
display = Display.getDisplay(this);
//get some play data
expenseItems = ExpenseInfo.LoadExpenses();
itemCount = expenseItems.size();
//Setup the UI
//#style expenseList
lsMain = new List("Expenses", List.IMPLICIT) ;
cmAdd = new Command("New", Command.SCREEN, 3);
cmEdit = new Command("Edit", Command.ITEM, 2);
cmExit = new Command("Exit", Command.EXIT, 1);
lsMain.addCommand(cmAdd);
lsMain.addCommand(cmEdit);
lsMain.addCommand(cmExit);
//add all the Expense items to lsMain
rebuildList();
}
//add all the expense items to lsMain
for(int i=0; i<expenseItems.size(); i++){
if (expenseItems.elementAt(i) != null){
ExpenseInfo exp = (ExpenseInfo) expenseItems.elementAt(i);
//#style expenseItem
lsMain.append(exp.getDescription(),null);
}
}
}